;******************************************************************************
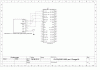
;GLCD mit SSD1306-Controller an ATmega16
;******************************************************************************
;Display: Monochrome 1.3" 128x64 OLED graphic display(AVR-praxis.de)
;fmcu=16MHz
;Controllerpin :Displaypin
;PB1 5 CS
;PB2 4 RST
;PB3 3 D/C
;PB5 MOSI 1 DATA
;PB7 CLK 2 CLK
;******************************************************************************
;Registerdefinition
;******************************************************************************
.def temp =r16
.def temp1 =r17
.def counter =r18
.equ display =PORTB
.equ cs =1
.equ rst =2
.equ dc =3
;******************************************************************************
;Interuptvektoren
;******************************************************************************
.org 0x00 rjmp init ;reset
;******************************************************************************
;Initialisieren
;******************************************************************************
init:
;Register löschen
clr temp
clr temp1
clr counter
clr zh
clr zl
;stack initialisieren
ldi temp,high(ramend)
out sph,temp
ldi temp,low(ramend)
out spl,temp
;Spi initialisieren
ldi temp,0b10111110 ;Setze sck,MOSI,PB4(da der Atmega sonst in den slavemodus geht),
out DDRB,temp ;D/C(PB3),RST(PB2) und CS(PB1) als Ausgang
ldi temp,0b01011101 ;Bit7 spi interrupt enable off, Bit6 SPI enable, Bit5 MSB first, Bit4 SPI Master
out SPCR,temp ;Bit3 Clockpolarity high, Bit2 Clock Phase Alpha, Bit1,0 f/16
;Display initialisieren
/* cbi display,rst ;Display resetten
rcall hundertms
sbi display,rst
rcall hundertms
sbi display,cs ;CS auf high setzen
ldi temp1,0xAE ;Display Ausschalten
rcall command
ldi temp1,0x00 ;definiere low Byte für Page adressierung
rcall command
ldi temp1,0x10 ;definiere high Byte für Page adressierung
rcall command
ldi temp1,0x40 ;Startposition festlegen
rcall command
ldi temp1,0x81 ;Kontrast einstellen
rcall command
ldi temp1,0xCF
rcall command
ldi temp1,0xA1 ;Zuordnung Spaltenadresse 127 zu segment 0
rcall command
ldi temp1,0xA6 ;Anzeige normal/nicht invertiert
rcall command
ldi temp1,0xA8 ;Multiplexrate auf 1/64 einstellen
rcall command
ldi temp1,0x3F
rcall command
ldi temp1,0xD3 ;setze vertikalen Display offset
rcall command
ldi temp1,0x00
rcall command
ldi temp1,0xD5 ;setze Displayoszillatorfrequenz
rcall command
ldi temp1,0x80
rcall command
ldi temp1,0xD9 ;setze pr-charge periode
rcall command
ldi temp1,0x22
rcall command
ldi temp1,0xDA ;setze Compin-Hardwarekonfiguration
rcall command
ldi temp1,0x12
rcall command
ldi temp1,0xDB ;Vcomh level festlegen
rcall command
ldi temp1,0x40
rcall command
ldi temp1,0x8D ;Deaktiviere charge-pump
rcall command
ldi temp1,0x10
rcall command
ldi temp1,0xAF ;Schalte Display ein
rcall command*/
ldi temp1, 0xAE        ; SSD1306_DISPLAYOFF
rcall command

ldi temp1, 0xD5        ; SSD1306_SETDISPLAYCLOCKDIV
rcall command
ldi temp1, 0x80
rcall command

ldi temp1, 0xA8        ; SSD1306_SETMULTIPLEX
rcall command
ldi temp1, 0x3F
rcall command

ldi temp1, 0xD3        ; SSD1306_SETDISPLAYOFFSET
rcall command
ldi temp1, 0x00
rcall command

ldi temp1, 0x40        ; SSD1306_SETSTARTLINE | 0x0
rcall command

ldi temp1, 0x8D        ; SSD1306_CHARGEPUMP
rcall command
ldi temp1, 0x10        ; off
;ldi temp1, 0x14    ; on
rcall command

ldi temp1, 0x20        ; SSD1306_MEMORYMODE
rcall command
ldi temp1, 0x00
rcall command

ldi temp1, 0xA1        ; SSD1306_SEGREMAP | 0x1
rcall command

ldi temp1, 0xC8        ; SSD1306_COMSCANDEC
rcall command

ldi temp1, 0xDA        ; SSD1306_SETCOMPINS
rcall command
ldi temp1, 0x12
rcall command

ldi temp1, 0x81        ; SSD1306_SETCONTRAST
rcall command
ldi temp1, 0x9F        ; external VCC
;ldi temp1, 0xCF    ; no external VCC
rcall command

ldi temp1, 0xD9        ; SSD1306_SETPRECHARGE
rcall command
ldi temp1, 0x22        ; external VCC
;ldi temp1, 0xF1    ; no external VCC
rcall command

ldi temp1, 0xDB        ; SSD1306_SETVCOMDETECT
rcall command
ldi temp1, 0x40
rcall command

ldi temp1, 0xA4        ; SSD1306_DISPLAYALLON_RESUME
rcall command

ldi temp1, 0xA6        ; SSD1306_NORMALDISPLAY
rcall command

ldi temp1, 0xAF        ; SSD1306_DISPLAYON
rcall command
;******************************************************************************
;Hauptprogramm
;******************************************************************************
main:
;Fülle Display
ldi temp1, 0x00 ;SSD1306_SETLOWCOLUMN
rcall command
ldi temp1, 0x10 ;SSD1306_SETHIGHCOLUMN
rcall command
ldi temp1, 0x40 ;SSD1306_SETSTARTLINE
rcall command
sbi display,cs
sbi display,dc
cbi display,cs
ldi zl, low(128*8) ;128x8 Byte senden. 128 Spalten, 8 Zeilen
ldi zh, high(128*8)
ldi temp1, 0xFF ;Daten zum senden (zum Füllen 0xFF verwenden)
filldisplay:
out SPDR,temp1
spiwarten2:
sbis SPSR, SPIF
rjmp spiwarten2
sbiw zl,1
brne filldisplay
sbi display,cs
rjmp main
;******************************************************************************
;Unterprogramme
;******************************************************************************
;sende Kommando
command:
cbi display,dc
rjmp send
;sende Daten
data:
sbi display,dc
;Senden über SPI
send:
cbi display,cs ;CS auf low ziehen
out SPDR,temp1 ;Byte aus Temp1 nach SPDR schieben und somit senden starten
spiwarten:
sbis SPSR, SPIF ;wenn das SPIF flag gesetzt ist wurde das Byte gesendet
rjmp spiwarten
in temp1,SPDR ;lese empfangenes byte und lösche SPIF
sbi display,cs
ret
;Warteroutinen
hundertms:
ldi counter,9
zehnms:
ldi xh,high(40000)
ldi xl,low(40000)
loop:
sbiw xl,1
brne loop
cpi counter,0
breq endloop
dec counter
rjmp zehnms
endloop:
ret